
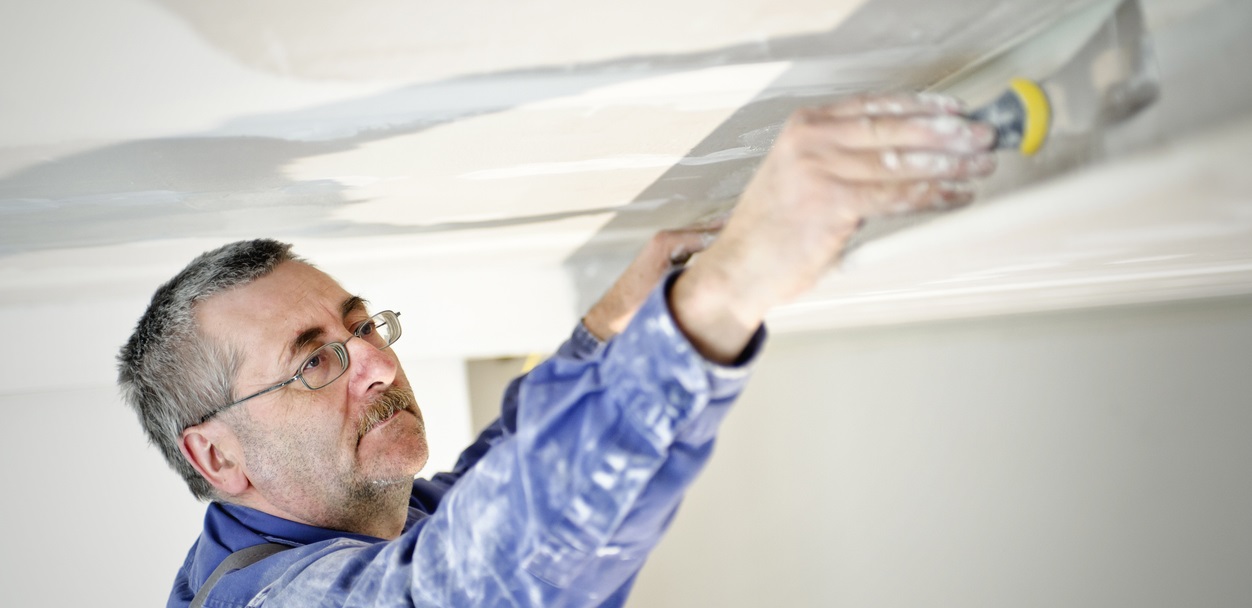
This is the Unitex installation guide for Uni-Shape architectural mouldings. It explains how to install architectural mouldings the way Unitex specifies: mechanically fixed, sealed at the edges, jointed correctly and finished so the profile stays crisp. It’s written for builders, carpenters, renderers and installers, and it’s based on the Unitex Uni-Shape usage and installation guide. The instructions apply to standard stock mouldings. Custom-designed shapes and unusual site conditions can need a different method, so talk to your local Unitex technical representative first, and check current building codes and your engineer’s requirements for the project.
In This Guide
- Installing solid mouldings (You are here)
- Allowing for movement joints
- Installing bespoke and void-formed mouldings
- Installing columns
- Repairing and caring for mouldings
Download the Uni-Shape usage and installation guide (PDF, issued February 2019)
Which Mouldings This Page Covers
These moulding installation steps apply to solid Uni-Shape mouldings: window profiles (heads, architraves and reveals) and sills, smaller stringers, parapets, quoins, pilasters and keystones, arches, arcs, pier and fence capping, and bespoke shapes. The larger void-formed shapes, such as window heads, parapet mouldings, corbels, large scotias and mid-level stringers, are fixed in the same way with a few differences, which the void-formed page covers. Columns have their own installation methods.
Why Uni-Shape Mouldings Are Mechanically Fixed
Unitex insists that all mouldings be mechanically fixed, and fixed tension free. Gluing alone relies on surface contact bonding, and over time and through varied environmental conditions that bond can weaken and fail. Mechanical fixers, if properly selected and applied, will last, which is why mechanically fixed mouldings are the only approach Unitex specifies. Sealants and adhesive foam are part of the installation, but they don’t replace the fixings. That is why the specifier’s clause for Uni-Shape mouldings and columns requires them to be supplied and installed as per the manufacturer’s instructions.
Before You Start: Handling, Safety and Site Storage
Standard mouldings are supplied in 2.4 and 3 metre lengths on 3.2 metre pallets. Unloading by fork truck is preferable, though they can be offloaded by hand. Store them on a concrete floor or level ground and leave them undisturbed until installation. Handle with care, and always carry a moulding length with your arms spread out and the profile on its side, to prevent cracking before it’s fixed. If a moulding cracks on site through mishandling, don’t install it. Contact Unitex to discuss.
Use a dust mask, safety glasses and gloves when working with lightweight mouldings, and hearing protection with power tools. All Unitex fixings, patching, levelling accessories and flexible mastics should be ordered and delivered with the mouldings, so the installer is working to the Unitex installation product guidelines. For cutting, carpenters can use the same methods as for exterior timber plinths and architraves, using a tungsten tip saw and mitre box or a sharp, clean drop saw and cutting bench. Check your angles, and measure twice to cut once.
Materials and Tools for Architectural Mouldings Installation
For architectural mouldings installation you’ll need Unitex UPC200 Putty, Polymer Render, Unitex PTC coating (flat) with or without sand, Uni-Flex Membrane coating (satin), mechanical fasteners, polycarbonate sealant, Sikaflex, adhesive foam, packers and foam backing material. The mechanical fasteners are nylon anchors, Easy-Drive anchors, and Class 3 coated timber screws for timber-frame construction. The tools are a tape measure, carpenter’s pencil, string line, level, putty knife, sponge, sealant gun, drill and bits, and a tungsten tip saw and mitre box or a drop saw and cutting bench.
How to Install Architectural Mouldings: Step by Step
Step 1: Check the Substrate
Check that the surface is even and level, and use packers if it isn’t. Precast panels, render, brickwork, blockwork, AAC and fibre cement sheeting often aren’t true, and fixing a profile to an uneven surface stresses it and cracking will result. Mouldings come in 2.4 or 3.0 metre lengths, and unnecessary stress can crack them with daily or seasonal thermal expansion and contraction.
Step 2: Position the Moulding
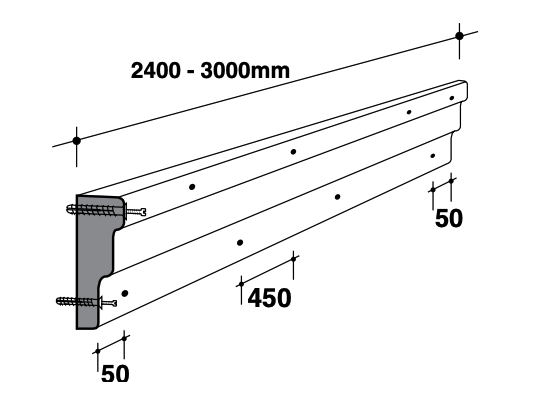
Run a string line at the lower edge where the moulding will be fixed, or at the outside edge for a window reveal. At sufficient intervals, drive temporary pins into the substrate, or use a small timber chock, and rest the profile on them before any permanent fixing. Every profile must be pre-drilled and countersunk before an anchor goes in, so the anchor heads sit snugly about 5 mm below the surface.
Step 3: Fix the Moulding to the Substrate
When fixing mouldings to masonry, drill through the pre-drilled moulding into the solid brick or block, not the mortar, because fixings can pull out of mortar. Use a drill bit to suit the anchor shank, and tap the anchor home without stressing the moulding. The anchor head must sit at least 5 mm below the profile surface, and the anchor must be secured at least 30 mm into the solid substrate. Over a 2.4 or 3.0 metre length, fix within 50 mm of each end as a minimum, then stagger-fix one side and the other at about 450 mm centres. On timber or steel-framed substrates, fix at every stud along the moulding.
Use nylon anchors with countersunk heads or Easy-Drive anchors. Fix to fibre cement sheeting with exterior Class 3 timber screws with countersunk heads, and fix large profiles through the sheet into the supporting frame. In corrosive environments, such as within 500 metres of the sea, stainless steel anchors are recommended. These instructions apply to standard stock products only, so check the fixing method for custom-designed products with your local Unitex technical representative.
Step 4: Fill the Anchor Heads
Use a putty knife to fill each anchor head cavity with Unitex Polymer Render, leaving a few millimetres for a top coat of UPC200 Putty. Rub the surface with a polystyrene block until it matches the texture of the profile. Don’t use UPC200 Putty at or in mould-to-mould joints.
Step 5: Seal the Edges
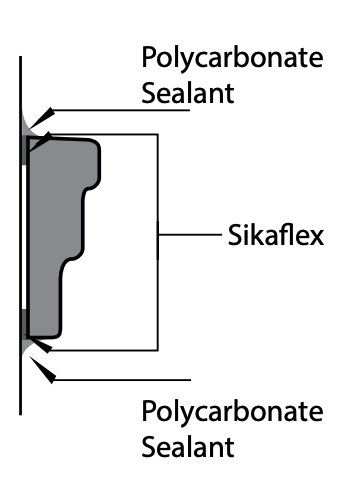
Once the full length is fixed, seal both side edges between the substrate and the leading edges of the profile. On the rear, seal both edges with Sikaflex, applied to the back of the profile so it squeezes out to the leading edges as the moulding is fixed and leaves no gaps. For medium-sized and larger profiles, apply extra Sikaflex to the rear centre of the moulding as well. A polycarbonate sealant with an expansion modulus of ±25% is applied at the leading edges, and Uni-Sealant is recommended. Acrylic and water-based gap-filler mastics must not be used.
Step 6: Join the Lengths
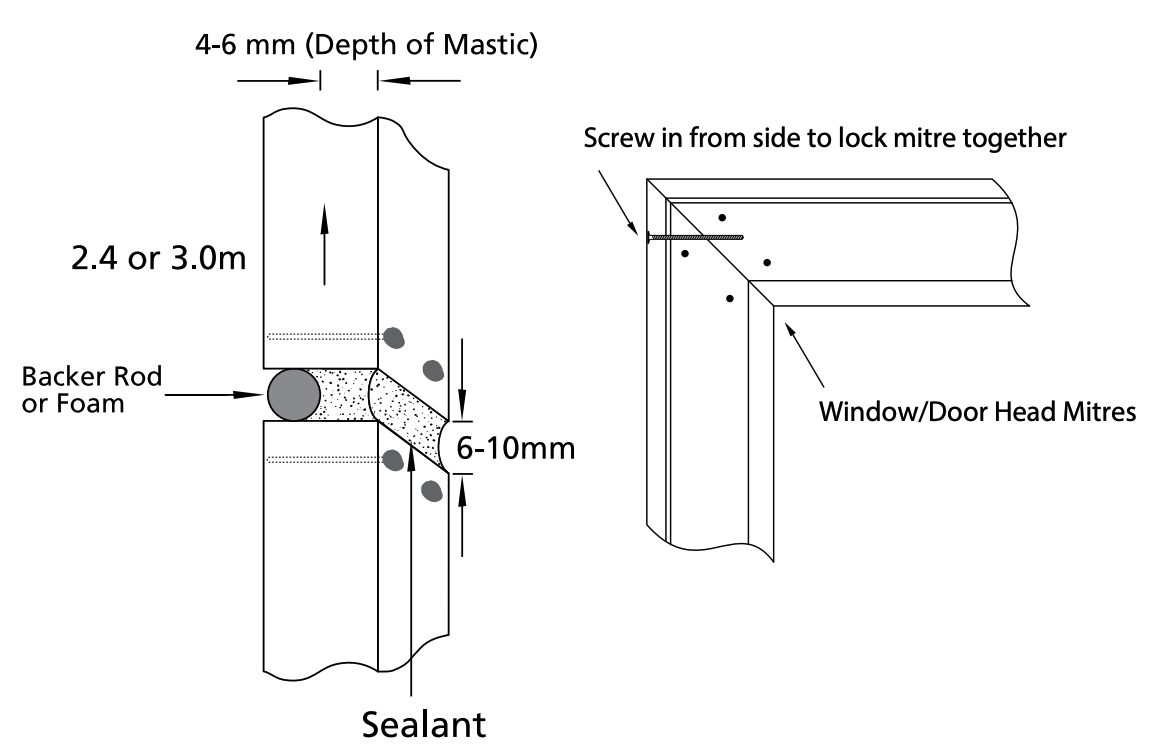
To join lengths, align them and leave a gap of approximately 6–10 mm, then seal it with mastic over a pre-fitted backer rod or foam to a depth of approximately 4–6 mm. Use polycarbonate sealant only, not Sikaflex. Cut ends must be dry and dust-free, and mastic should be applied half as deep as it is wide. The clean surface is then scalloped, which leaves a fine, visible pencil joint. If the mastic cracks later from building movement, thermal expansion or the facade settling, it can be re-applied. At window and door head mitres, a screw from the side locks the mitre together.
Step 7: Allow for Building Expansion Joints
Always leave the same size gap in the profile as in the engineered building expansion gap joints. The moulding movement joints page explains how a moulding crosses a movement joint, when gaps can stay open, and what the builder and engineer are responsible for.
Step 8: Finish the Mouldings
Don’t overcoat Uni-Shape mouldings with texture, because the corners are crisp and sharp and texture would soften them. For best results, coat with Uni-Flex Membrane (satin) or Unitex PTC (flat), with or without sand, in the colour of your choice. Coverage is approximately 1 litre per m².
Frequently Asked Questions
What anchors should I use to fix Uni-Shape mouldings?
Use nylon anchors with countersunk heads or Easy-Drive anchors into masonry, and exterior Class 3 timber screws with countersunk heads into fibre cement sheeting. Within 500 metres of the sea, stainless steel anchors are recommended. These instructions apply to standard stock products only.
How far apart should the fixings be?
Over a 2.4 or 3.0 metre length, fix within 50 mm of each end as a minimum, then stagger-fix one side and the other at about 450 mm centres. On timber or steel-framed substrates, fix at every stud along the moulding.
Can Uni-Shape mouldings be glued on?
Not on their own. Unitex insists that all mouldings be mechanically fixed, because gluing alone relies on surface contact bonding and can weaken and fail over time. Sealants and adhesive foam are part of the installation but don’t replace the fixings.
Should Uni-Shape mouldings be texture coated?
No. Texture would soften the crisp corners of the profile. Coat with Uni-Flex Membrane (satin) or Unitex PTC (flat) in the colour of your choice.
Can I install a moulding that has cracked on site?
No. If a moulding is cracked on site by mishandling, don’t install it. Contact Unitex to discuss.
Talk to Unitex Before You Install
For help with fixing methods, custom mouldings or unusual site conditions, contact the Unitex technical sales team on 1800 RENDER or sales@unitex.com.au. You can also download the full guide as a PDF, issued February 2019, and confirm the current version with your technical representative.