
Buildings move, and mouldings that ignore that movement crack. This page explains how expansion joints for architectural mouldings work with Uni-Shape mouldings: the mastic joints between lengths, matching the gap to the engineered building joint, and fixing a moulding to one substrate so it floats over a movement joint. The instructions apply to standard stock mouldings. The builder and engineer remain responsible for designing the building’s movement joints, so check your project’s requirements and current codes, and confirm details with your local Unitex technical representative.
In This Guide
- Installing solid mouldings
- Allowing for movement joints (You are here)
- Installing bespoke and void-formed mouldings
- Installing columns
- Repairing and caring for mouldings
Download the Uni-Shape usage and installation guide (PDF, issued February 2019)
Mastic Joints Between Mouldings
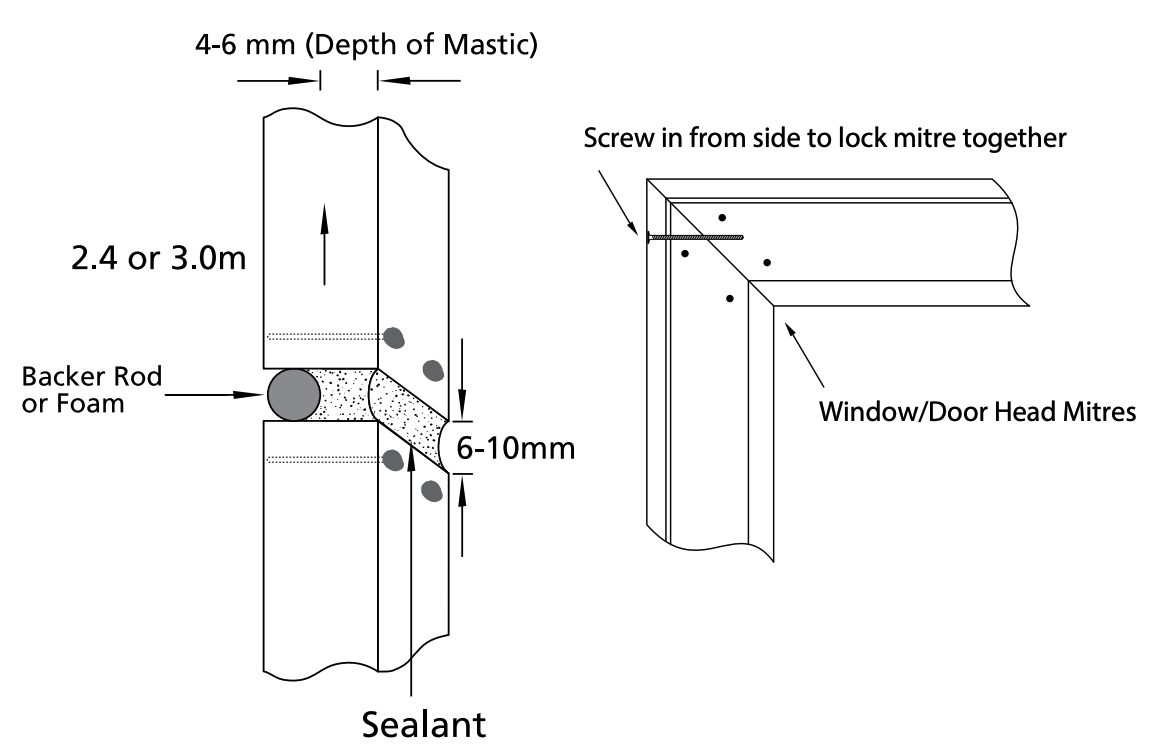
Uni-Shape mouldings generally come in 2.4 or 3.0 metre lengths and are fitted together with an approximate 6–10 mm straight cut gap. The gap is filled with polycarbonate sealant over a backer rod or foam filler, and the clean surface is then scalloped, which leaves a fine, visible pencil joint. Use polycarbonate sealant only, not Sikaflex. Cut ends must be dry and dust-free before the mastic goes in, and correct mastic application is half as deep as it is wide, to a depth of approximately 4–6 mm.
Cracking at these mastic joints between mouldings will sometimes occur because of building movement, thermal expansion, or drying and settling of the facade profile. When it does, the mastic can be re-applied at a later date. UPC200 Putty isn’t designed for use in movement joints or between adjoining lengths of mouldings.

Expansion Joints for Architectural Mouldings: Match the Gap to the Building Joint
Building expansion joints sit at dissimilar substrate junctions and at precast panel to precast panel junctions. For moulding movement joints, always leave the same size gap in the moulding profile as in the engineered building expansion joint.
Your builder and engineer must design the project with building movement in mind, and as generally good building practice, expansion or movement joints should be built at least every 6 metres in every elevation. Fibre cement sheeting is a common trap. The gaps between butt-jointed sheets, around 3 mm, aren’t to be taken as expansion joints for this purpose, and fibre cement sheet expansion joints need to be planned separately. It’s the responsibility of the builder and the architect or engineer to predict the likely building movement and surface thermal movement before the mouldings are installed, and to expect a minimum 10 mm expansion or slip joint at least every 6 metres in every elevation. Unitex doesn’t take responsibility for a design that doesn’t allow for substrate movement.
Where Wide Gaps Stay Open
In many cases where the expansion joint gaps are around 20 mm, mastic between the mouldings isn’t used and the gaps remain open without sealant in between. Aesthetically this can work well, especially between precast panels on commercial projects.
Installing Mouldings Over Expansion Joints: Fix to One Substrate Only
Sometimes a movement joint is designed around a structure, for example at the junction of a fibre cement sheet upper floor wall and a blockwork or brickwork wall below. At that movement junction, the moulding is fixed to one substrate only and floats over the movement joint. It’s never fixed to the adjoining substrate. Done this way, the movement joint is neatly hidden behind the moulding, and the moulding isn’t stressed as the two substrates move.
Mitres and Thermal Movement
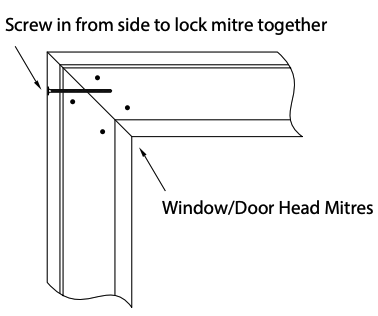
Because mouldings come in 2.4 or 3.0 metre lengths, it’s advisable not to put any unnecessary stress on the profiles, otherwise cracking can occur with daily or seasonal thermal expansion and contraction. At window and door head mitres, a screw from the side locks the mitre together, and UPC200 Putty shouldn’t be used in mitre cuts.
Render and Coating Joints Are Different
The joint figures for mouldings, a 6–10 mm gap sealed to 4–6 mm, aren’t the same as the figures for render and EIFS coating systems, so don’t carry numbers from one to the other. For render joint spacing, and why cracking follows when joints are skipped, read our guide to why render cracks and how expansion joints work.
Frequently Asked Questions
What size gap do I leave where a moulding crosses an expansion joint?
Always leave the same size gap in the moulding profile as in the engineered building expansion joint.
Do the joints between fibre cement sheets count as expansion joints?
No. The gaps between butt-jointed fibre cement sheets, around 3 mm, aren’t to be taken as expansion joints for this purpose. The builder and the architect or engineer must predict the likely building movement, and a minimum 10 mm expansion or slip joint at least every 6 metres in every elevation is to be expected.
Should I seal a 20 mm expansion gap between mouldings?
In many cases where the gap is around 20 mm, mastic isn’t used and the gap stays open without sealant, which can work well aesthetically, especially between precast panels on commercial projects.
What if the mastic between two lengths cracks?
Cracking at a mastic joint can happen because of building movement, thermal expansion, or drying and settling of the facade profile. The mastic can be re-applied at a later date.
Can a moulding be fixed across a movement joint?
No. Where a movement joint runs through a wall, the moulding is fixed to one substrate only and floats over the joint. It is never fixed to the adjoining substrate.
Talk to Unitex About Movement Joints and Your Project
For help planning mouldings around movement joints, contact the Unitex technical sales team on 1800 RENDER or sales@unitex.com.au, or request a quote.